• Skip to main content

FabHappy

FabHappy Art - unique gifts, handmade

  • Home
  • Blog
  • About
    • About Us
    • Our Pottery Studio
    • Privacy Policy
  • Search
  • Contact
    • Subscribe
    • Send an email

Peter

Sep 23 2019

Squishies – amazing textile art

Squishies – amazing textile art

From Daisy Collingridge

Gloria and I have known Daisy Collingridge for a while now and there’s no doubt she’s an amazing artist in so many ways. I’m not using the word “amazing” lightly and you’ll see what I mean when you see her textile art, her “squishies”, in this article. Daisy was so nice to agree to answer some of my questions about her textile art and I’ve recorded her answers below.

What do you call these amazing creations that look like “fat suits”?

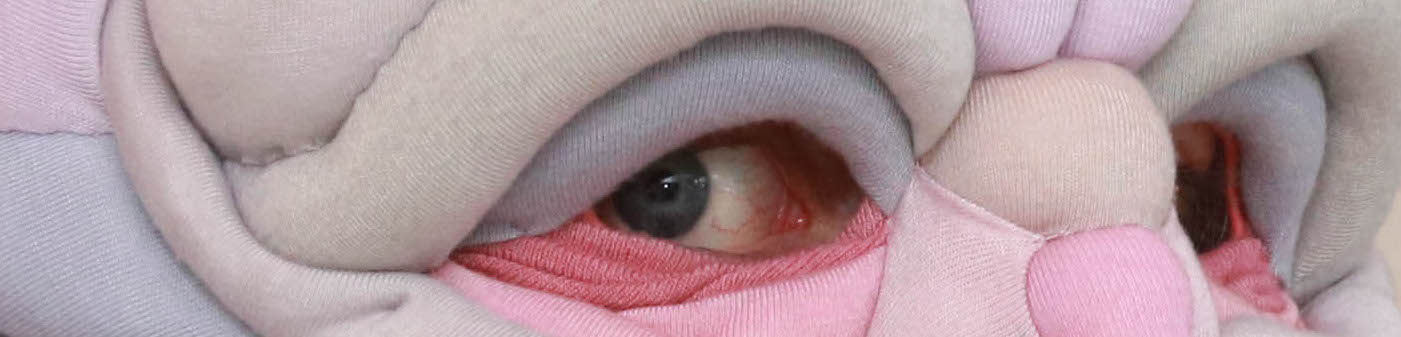
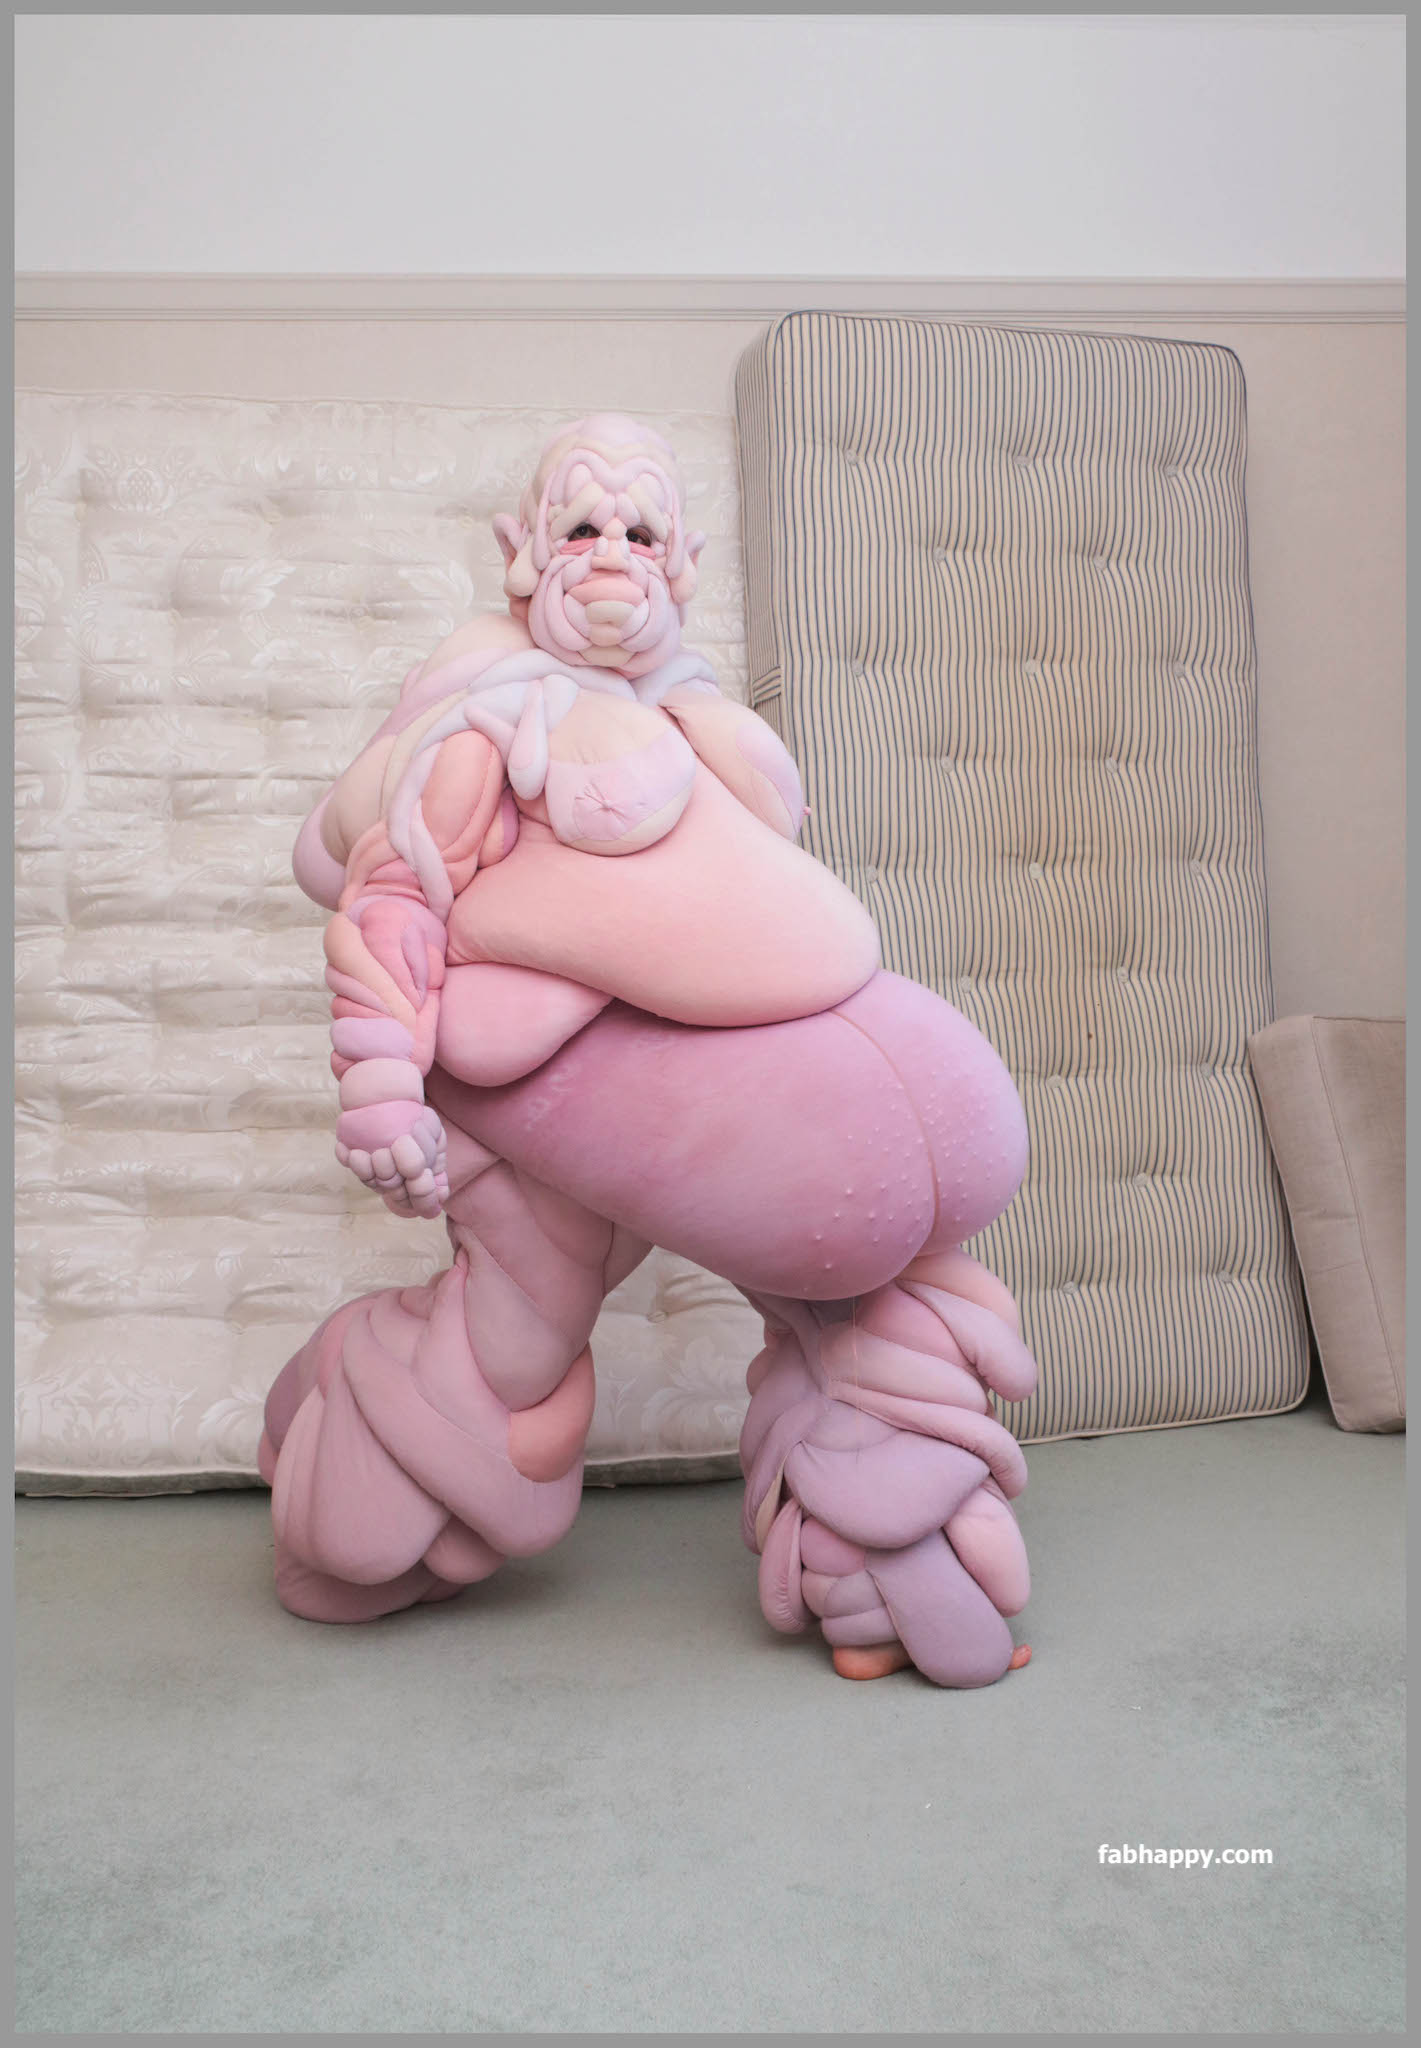
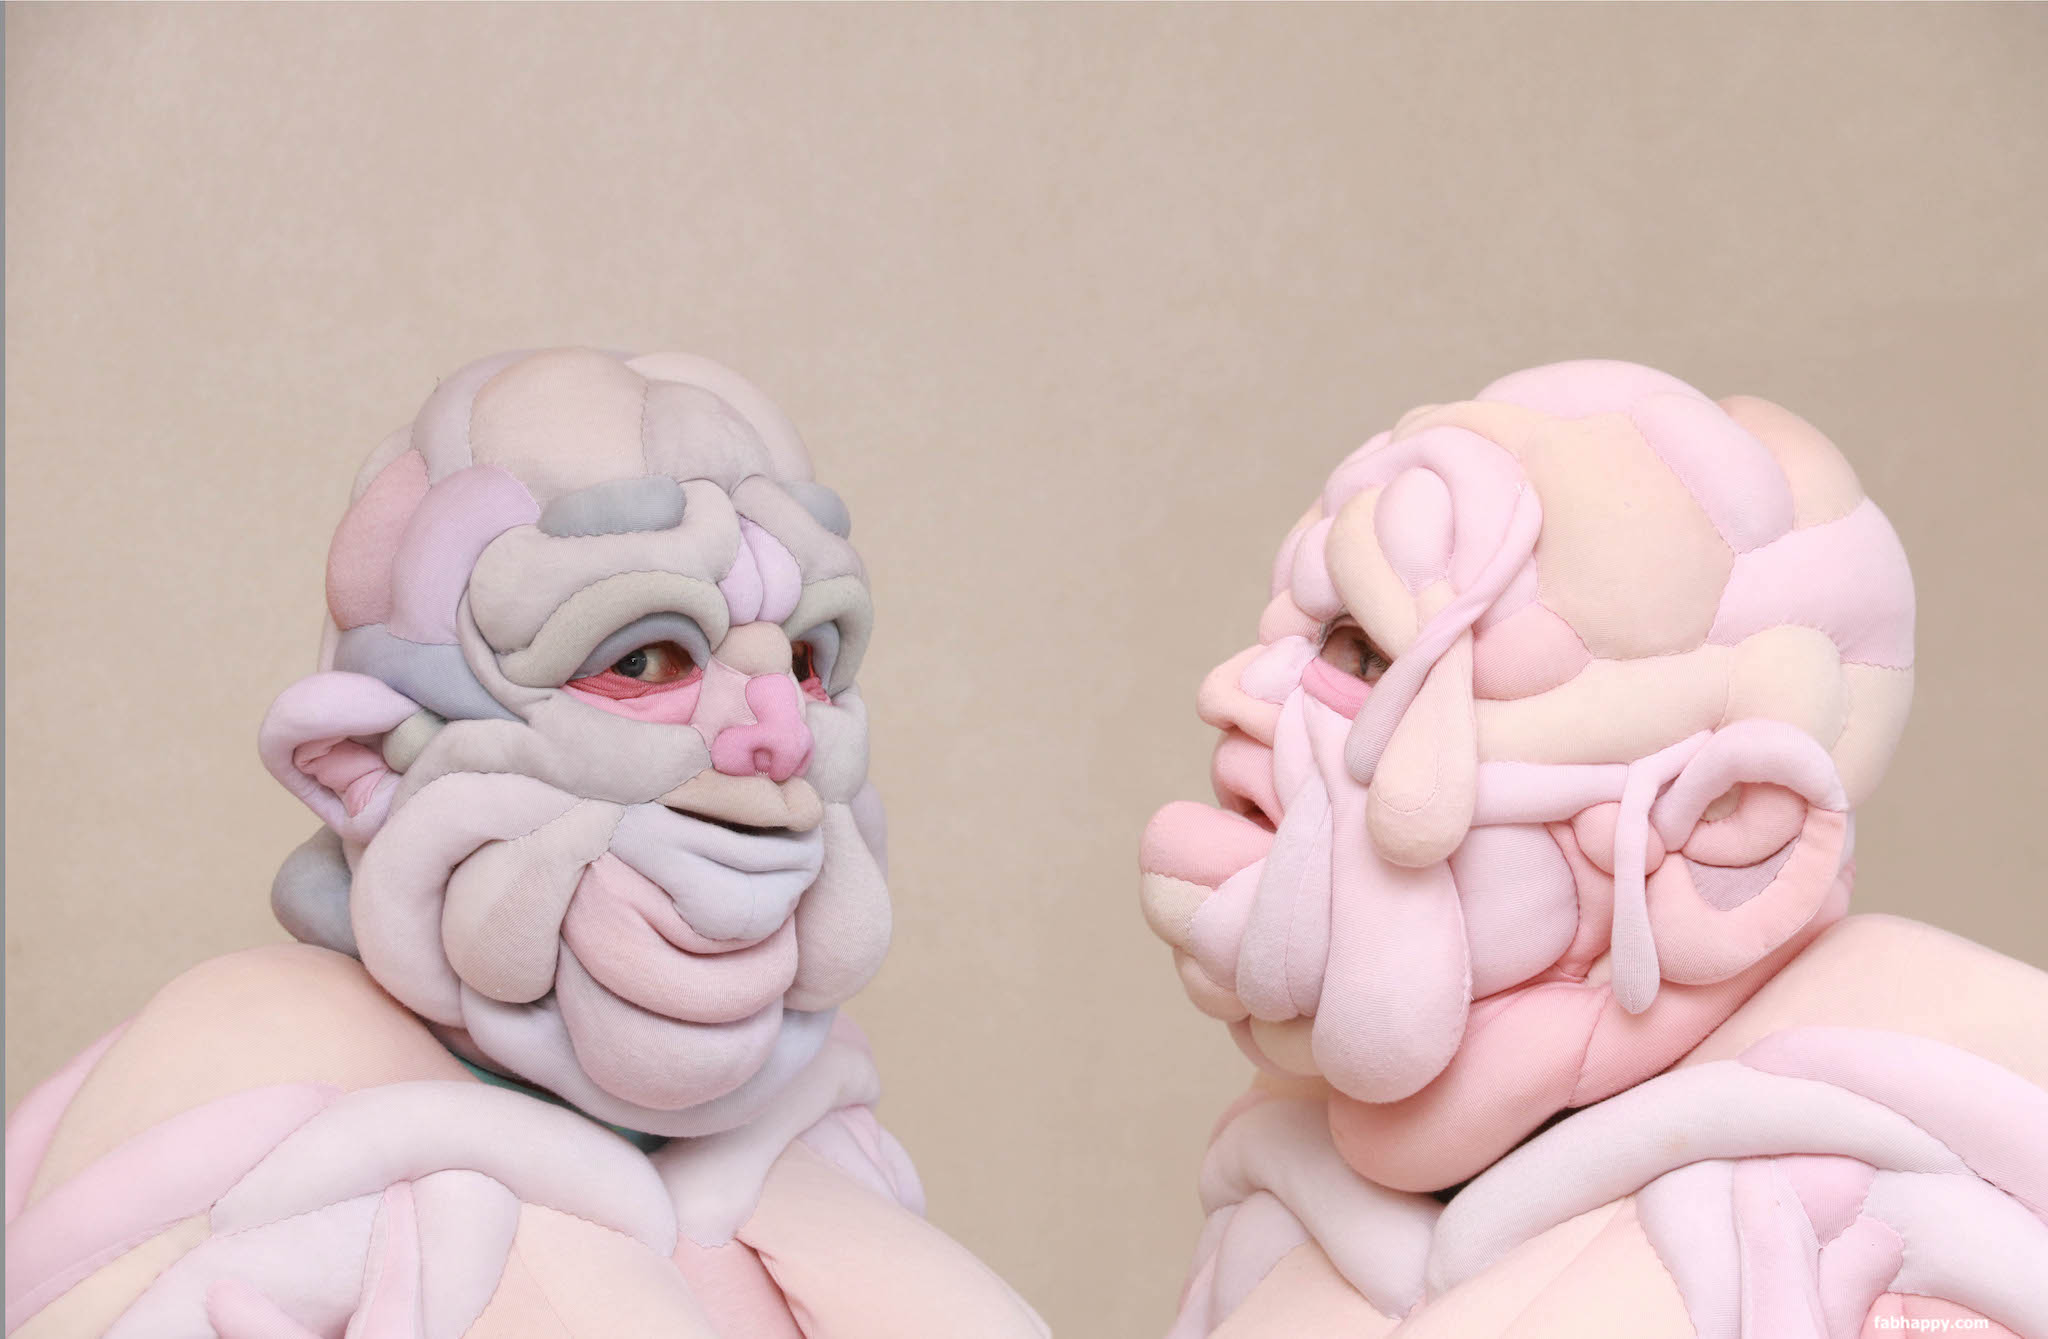
Daisy – “I affectionately refer to them as my ‘Squishies’. I spend so long making them that they definitely become animated characters to me. If asked to describe them I would say they sit in an awkward space between sculpture and performance art.”

A squishy in progress

Where and when did you get the inspiration for this?

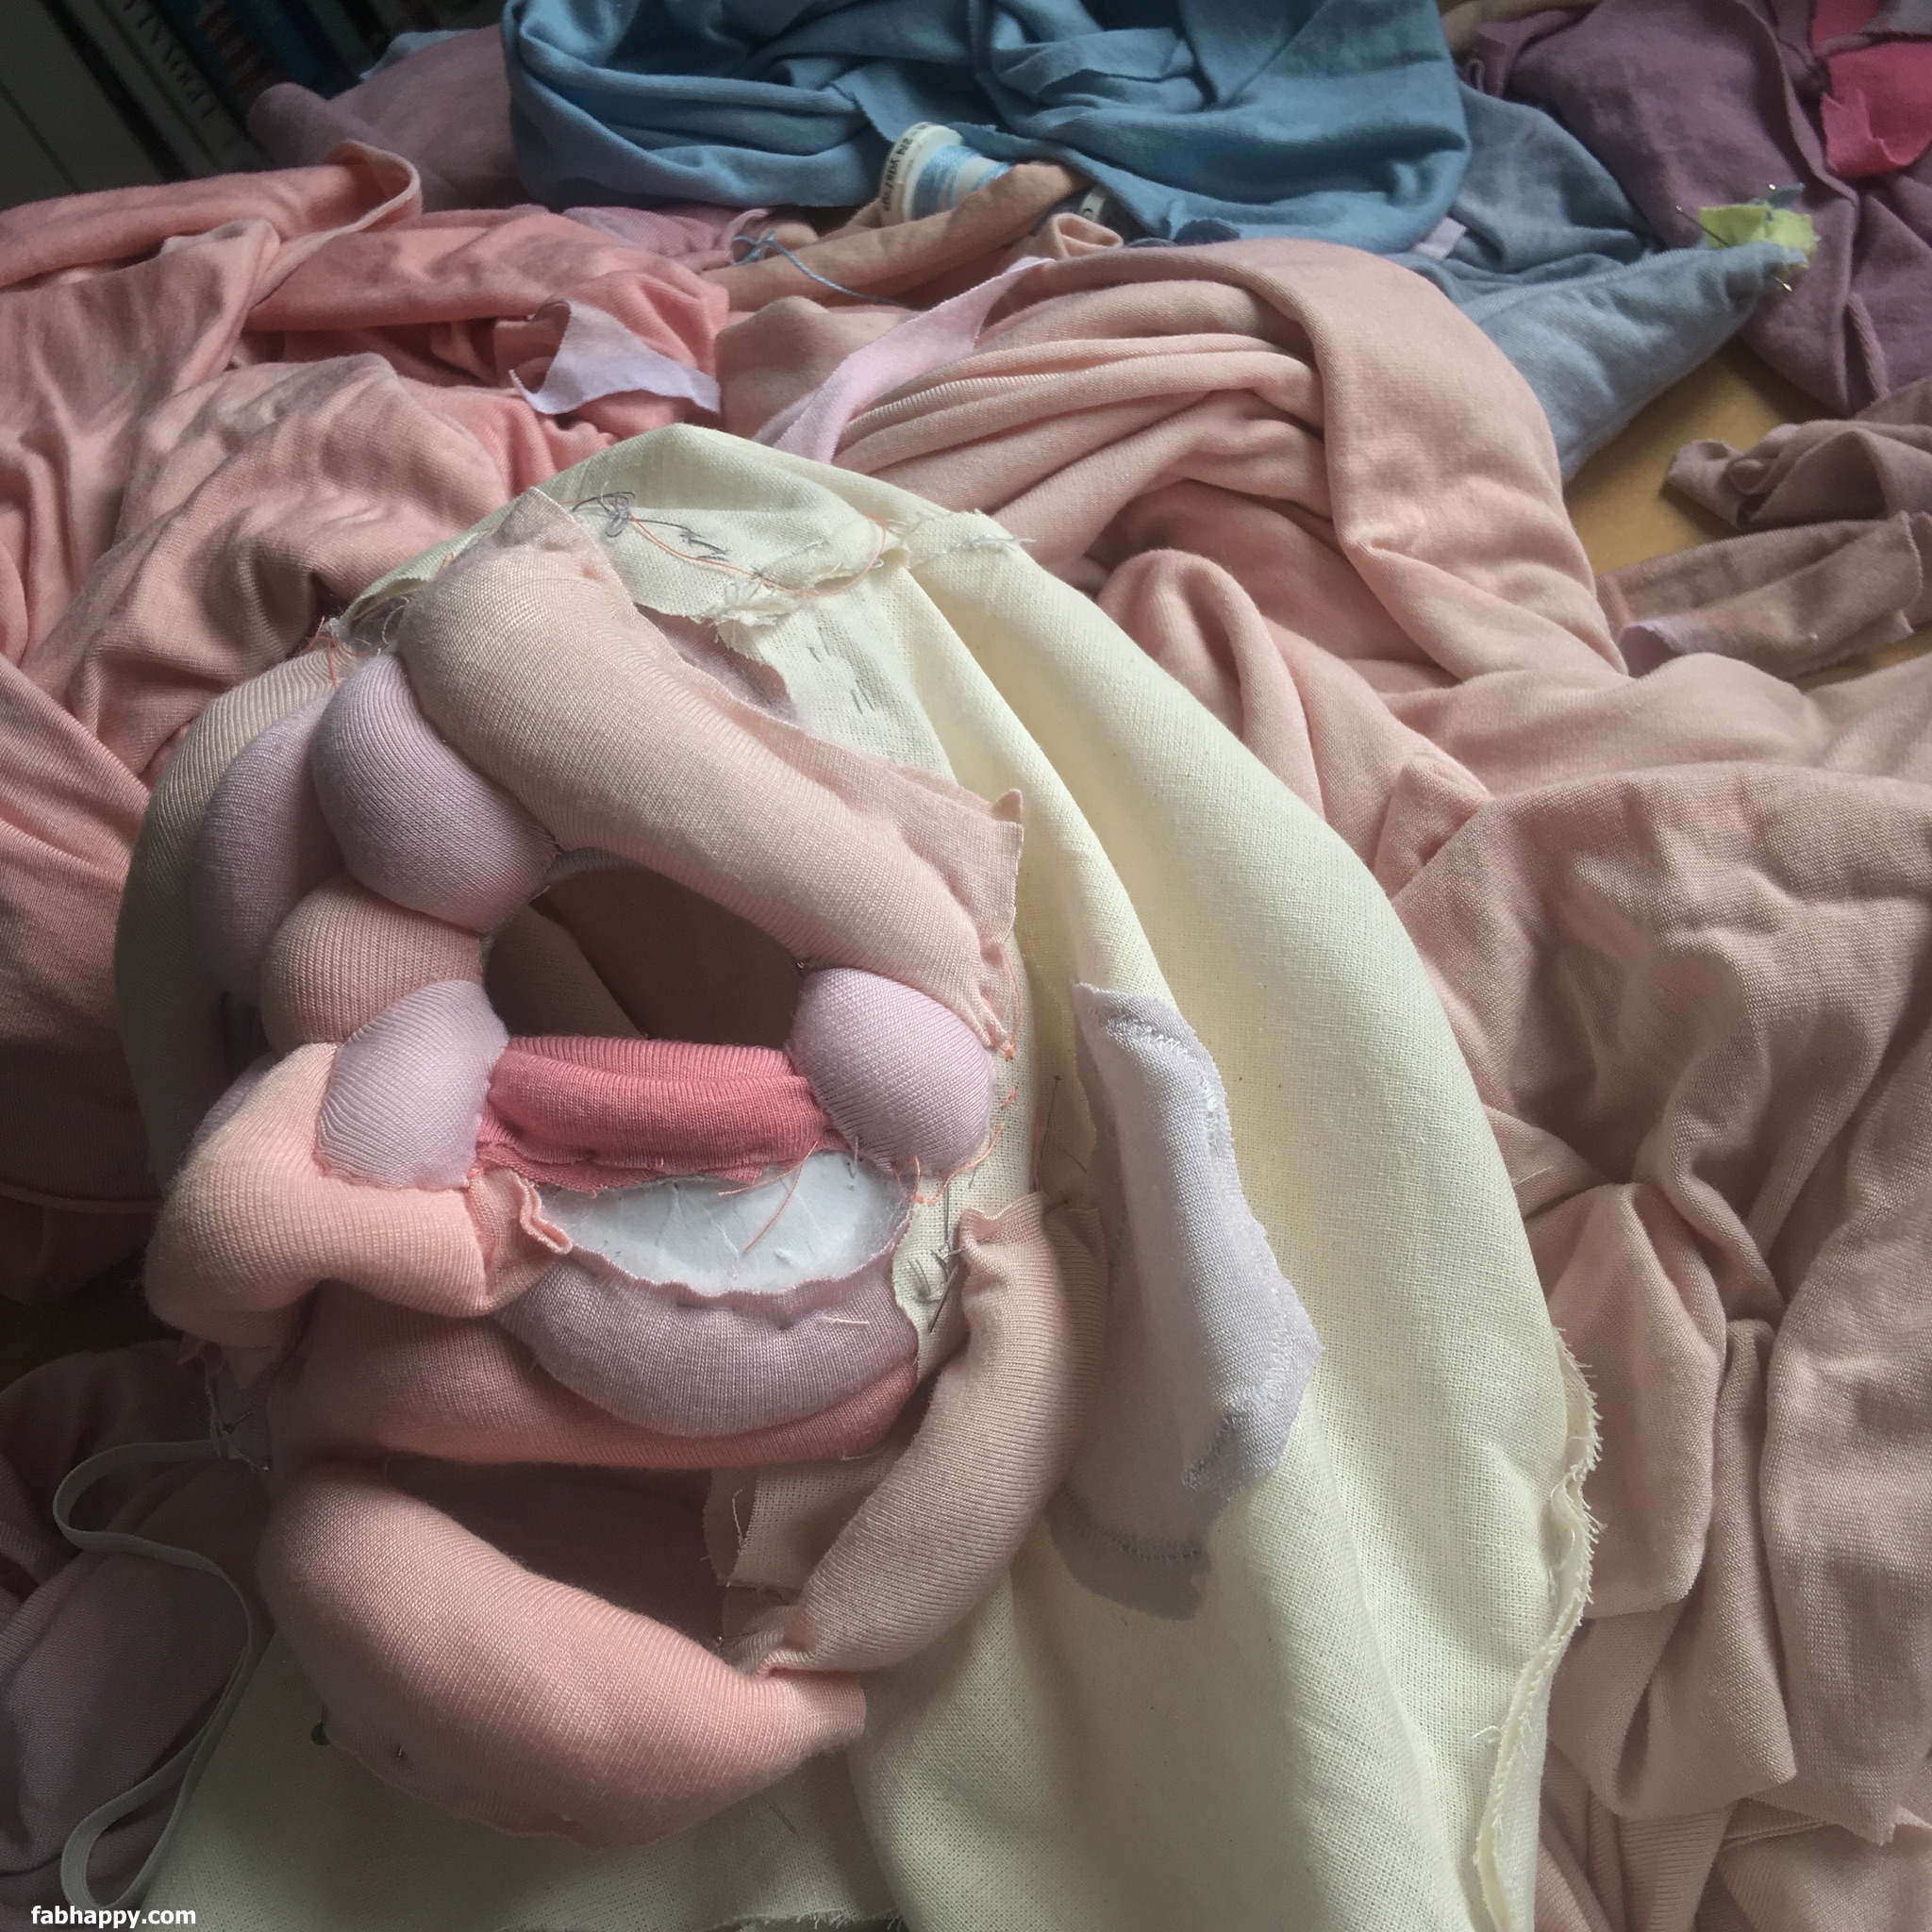
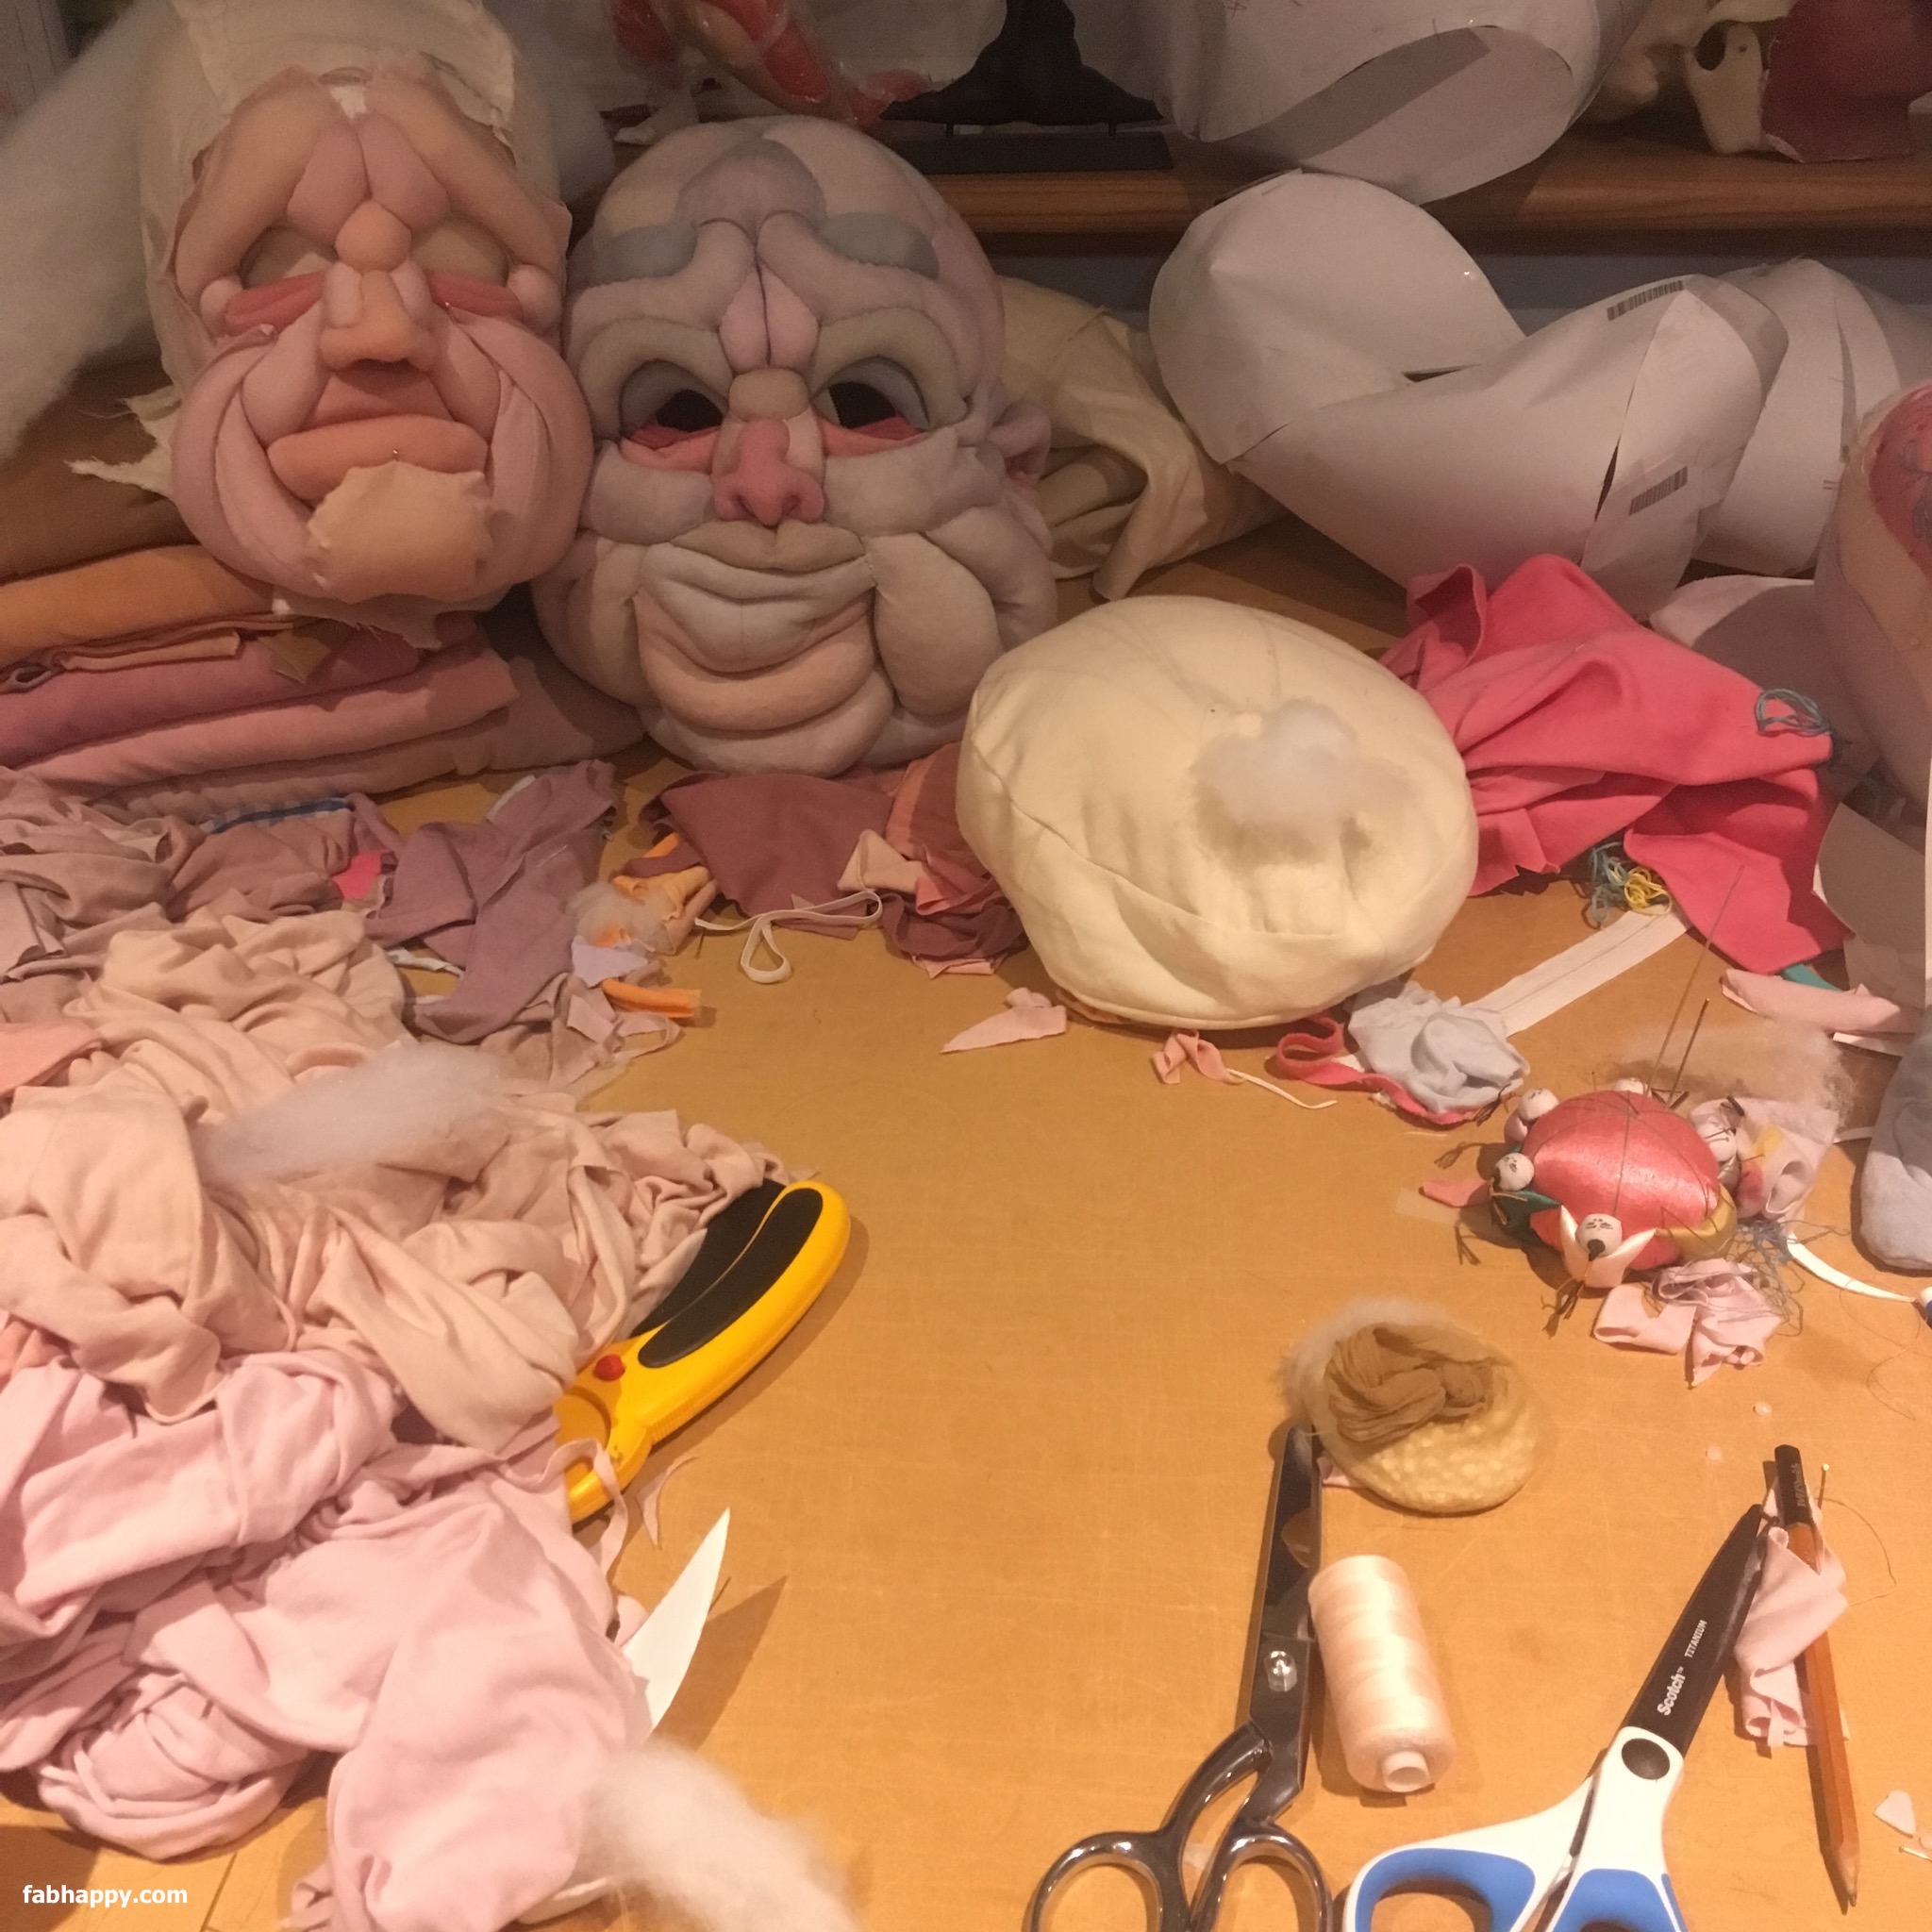
Daisy – “I made the first ‘Squishy’ in 2016. It’s been a development process since then. Each time refining the technique as well as experimenting with colour palettes, weight, and pattern cutting. The inspiration is a hard one to decipher. My degree is in fashion design. The course was a conceptually led rather focused purely on making clothes. It gave me grounding in technical garment construction combined with freedom of thinking. My graduate collection was entirely free machine quilted. The ‘Squishies’ developed by pushing the technique of quilting to the extreme. Using layers of wadding sandwiched between fabrics to create extreme ‘puffs’- a pattern in relief. My work is always technique/craft led, rather than concept led, but it is unsurprising that I have chosen the human figure to explore. I come from a family of doctors, nurses and scientists. I loved biology and PE at school. The human body is fascinating: its ability to heal, to be pushed to physical limits and also to self-destruct. We are all made of the same components, yet as individuals we are all unique.”

Bits of Squishies all over the place

How long does it take you to make one?

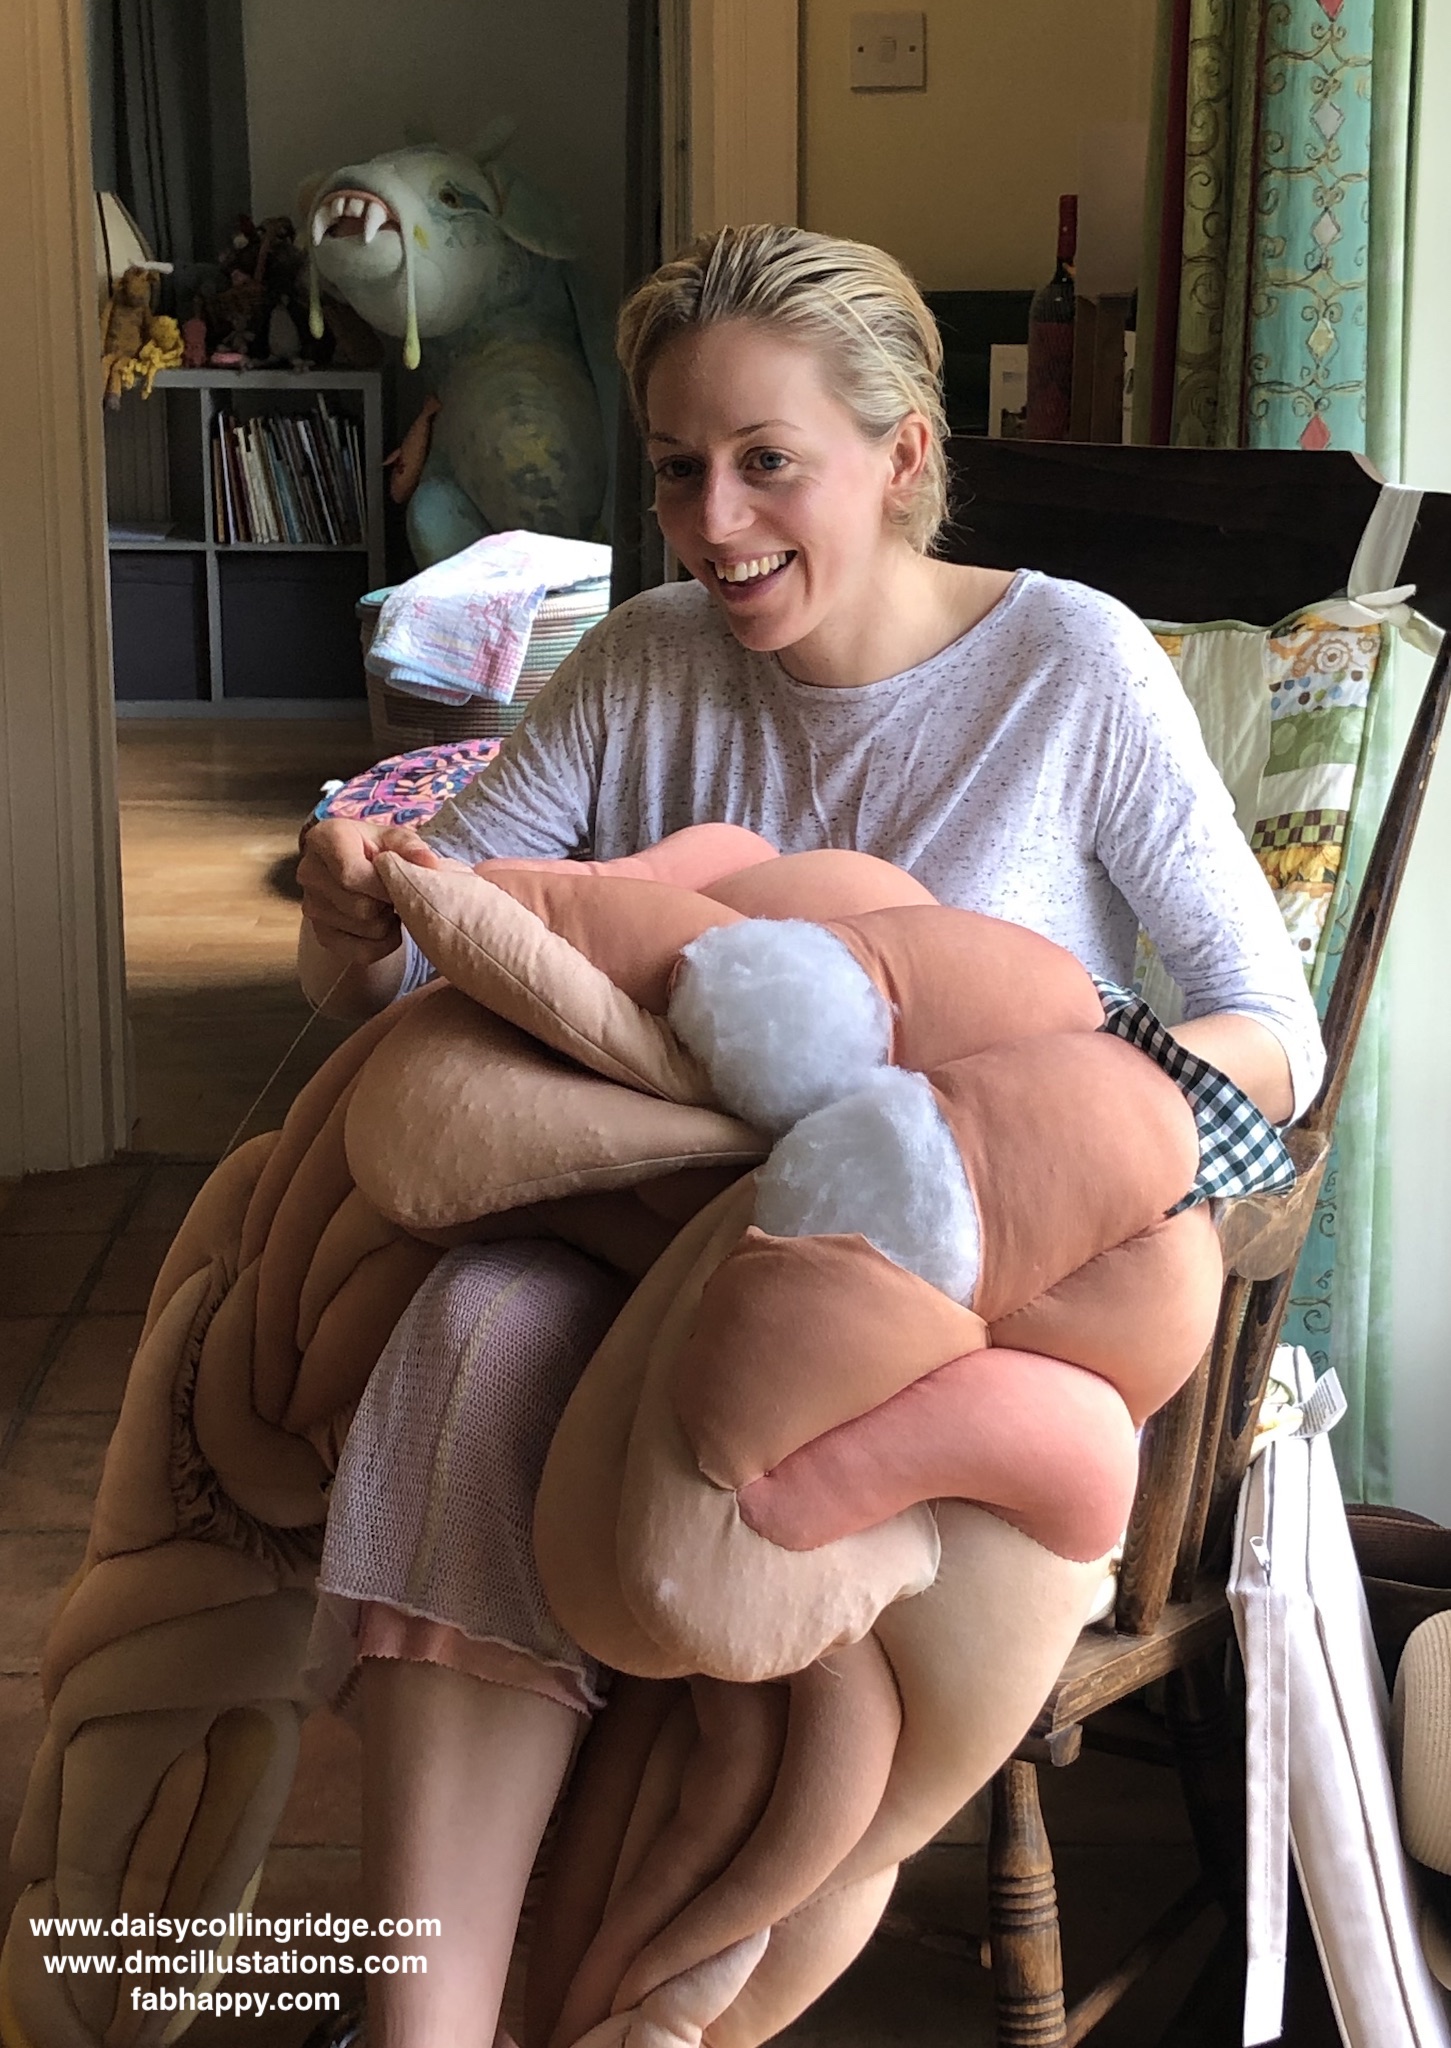
Daisy – “I’ve never timed it but I suggest they take a very long time to make. I did make Burt in 6 weeks, but I did nothing else but make Burt. They are predominately hand stitched which obviously takes a long time!”

What materials do you use?

Daisy – “Hand dyed jersey and cotton, wadding, weighted pellets, beanbag beans, thread, and sand.”

Is there any special skill you needed to learn?

Daisy – “Not really. Essentially the technique is hand-sewn appliquéd quilting. It is a bit like ‘Trapunto’ combined with crazy patchwork. Other techniques I use are pattern cutting to make the free hanging pockets as well as hand dying to get the tonal colour palettes.”

Do you have a clear vision of a piece before you start making it?

Daisy – “Ultimately I make on impulse with only a rough plan. I had a ‘How to make a teddy bear’ book as a child. In the book it suggested you should make the head first so that the bear could watch you make it the rest of its body. I have adopted this method. After I’ve dyed the fabric, I make the head first. I let the head inform me what the character will be. At this stage I may do a sketch of the ‘silhouette’ of the rough body shape and then plough on regardless.”

squishies
squishies

What people worldwide have been interested in you work?

Daisy – “My favourite story is that I made a dress for ‪Bjork‬. It wasn’t one of my ‘Squishies’; it was a yellow quilted dress. That is still my biggest claim to fame.”

What do people want them for? How are they going to use and/or display them?

Daisy – “This is a question people ask me frequently. I wonder if people ask the same question of a painting or a sculpture? I accept they live in an awkward boundary between art, performance art, fashion and the dreaded ‘textile art’ tag. If they weren’t wearable and just existed as sculpture would they be accepted as sculpture? For me they are sculptures of the human form. They exist as objects of beauty and a point of reflection. They are no different than the men carved from stone at the British museum… except maybe their longevity.

Four ‘Squishies’ will be on show this Autumn; Burt, Clive, Dave and Hillary will be shown as part of the galleries at the Knitting and Stitching show (see www.theknittingandstitchingshow.com) this autumn in London, Dublin and Harrogate. They will be shown in still sculptural form. Though we might bring one to life.”

Do you have items for sale now?

Daisy – “Nigella is small version of the larger wearables. She is being shown at 108 Fine art in Harrogate in November (see 108fineart.com). She will be on sale there. I would like to use all four of them to create some imagery and film before I think about giving them new homes!”

Is this still a passion of yours, or are you on to something new?

Daisy – “Making 3D sculptures is definitely a passion. Its what I get most excited about. I think it is time to go back to an experimental phase. I’ve got so many things I want to play with and explore but it’s always hard to allow yourself the time to just play without necessarily producing something at the end.”

I, for one, hope that Daisy gives herself time to “just play”. I doubt very much that such activity of hers will produce nothing and I’m sure we’ll see some more new and amazing things from her in the future.

squishies
squishies - daisy collingridge
Daisy at work on a Squishy

So it’s with great thanks extended to Daisy for sharing her experience with and passion for 3D sculptures and her “Squishies”. They certainly are amazing. And this isn’t the only example of amazing art that emanates from Daisy Collingridge, but that’s another story… 


You can find out more about Daisy Collingridge using the following links;

  • www.daisycollingridge.com
  • www.dmcillustrations.com
  • On Instagram at @daisy_collingridge

Written by Peter · Categorized: Features · Tagged: sculpture, textile art

Sep 02 2019

Clay Sedimentation Tank – a DIY alternative

When I put together our pottery studio, one of the conundrums was how to deal with cleaning all the equipment with clay attached without clogging up the pipes and the drains. The standard way of doing this is by using a sedimentation tank, or settling tank, but these cost around £300 minimum and when I looked at them, they seemed rather simple. I started to wonder if I could make something that did the same job but much cheaper, and I think I’ve succeeded.

[Just click on the images below to see them full-size]

The standard, commercial sedimentation tank looks like the one on the right (this one, for example, is available from Bath Potters). It involves a plastic box with the water entering at one end and exiting the other. The box is divided into several compartments and the barriers between each compartment are at different heights. Once the first compartment fills with water, it overflows into the second compartment, and when that fills, it overflows into the next, etc. As clay material sinks in water (some quickly and some gradually), it will become sediment on the bottom of the compartments and the water that overflows to each compartment will be cleaner and cleaner.

sedimentation tank

I came up with a plan to do something similar with simple components. The first decision was to get a commercial kitchen pot cleaning sink for our pottery studio. This is made out of stainless steel and is very deep, and it comes with unusual, very tall, overflow plugs. I hadn’t seen these before but they worked out perfectly for what I needed to do.

large stainless steel pot sinks

I purchased two simple plastic boxes from Hobbycraft here in the UK, one about half the volume of the other, but both having the same height. The idea is that we wash and empty the clay into the smallest box, which then overflows into the bigger box, when then overflows into the sink. Notice, the tall stainless steel “plug” in the pot sink? This stops the water going down the plughole, so I can manage that (the plug has a hole in the top, but that’s quite high in the sink). However first, I need to explain how I manage a sensible overflow of water between the two boxes.

clay sedimentation tank

Before explaining how to manage the overflow, here’s a photo of the two plastic tubs just after I’d cleaned them out (it works out I need to do this every 4-6 months with our usage). It’s a messy business, cleaning out these tubs, but it would also be messy to clean out a commercial sedimentation tank. Now I’m going to show how I made the tubs overflow into each other in a controlled way.

In two corners of the smaller tub, I drilled a couple of holes like you can see here. The holes are quite high up. I want the small tub to fill quite high. The two corners that I drilled are the corners that are furthest away from the disturbance of the tap. It’s best if the water that starts passing through the drilled holes is as calm as possible, which means more of the clay will have had a chance to sink towards the bottom and hence be trapped in the tub and never make it to the drain.

Now, in one of the long sides of the larger tub, I drilled three holes. These holes have to be lower than the holes in the smaller tub, probably by at least 2-3 cms. This makes it possible for the water in the smaller tub to flow into the larger tub, and the three holes here in the larger tub allows the water to flow into the sink.

Here are the tubs put together in the pot sink. I’ve highlighted where the holes have been drilled. The two smaller circles show where the holes have been drilled in the smaller tub. The larger ellipse shows where the three holes are in the back of the larger tub.

clay sedimentation tank

The water originally gets disturbed by the tap or by washing in the smaller tub. Hopefully, a lot of the dirt will settle in this first tub and the water that overflows to the larger tub will be cleaner. Now, the holes in the larger tub are as far away as possible from where the water enters from the smaller tub, which should allow more dirt to settle in the second tub before overflowing to the sink.

clay sedimentation tank

The water that makes it through both tubs doesn’t go straight down the plughole because of the tall pot sink plug, so the sink becomes another opportunity for dirt to settle. When the sink itself starts to fill and the water level approaches the height of the holes in the larger tub, I need to pull out the tall plug, letting most of the water out, not all, and then put the plug back in. If I let all the water out, then dirt that has settled to the bottom of the sink will be encouraged to start going down the plug hole.

After all the water has been idle overnight, it’s possible to slowly let all the water out of the sink. Then I can scoop out any clay I find at the bottom of the sink and throw it in the rubbish. Generally, I find this system works quite well with very little clay going down the plug hole, and it cost me about about £20 instead of over £300.

I’d be interested to know if you have a better alternative or an improvement to the simple, DIY sedimentation tank I’ve described above.

Written by Peter · Categorized: In the studio · Tagged: pottery

Aug 14 2019

Some of my pots in Aus

To me this is amazing. Someone in Australia wanted to buy a couple of my creations, and they like them! They sent me back some photos of where the bowl and plate is in their house (see below). To use a word that seems pretty common here in the UK, I’m “chuffed”. I have some pots in Aus.

pots in Aus

I keep thinking of myself as a scientist who’s not good at art. That must be what I thought was true about myself when I was young, and it has stuck. Today, I believe that everybody has art within them, and it’s just a question of if and when it’s allowed out. However, I still don’t think I’m good at art (maybe I’m wrong?).

The lady who bought these items from me also had an interesting story. She told me that she’s keeping them on a sideboard next to some other pots about which she said – “They are created by an Australian lady named Philippa James in the 1920s. She studied with one of the Boyds. These jugs are now on their third generation of our family. I rescued them from the OP shop pile my sister-in-law created when mother-in-law went into a Nursing Home. Her comment was ‘They are only worth what someone will pay for them’. Now I love my sister-in-law, but…”. Here’s the photo of the pots by Philippa James;

pots by Phillipa James
Philippa James’ pots.

It’s hard to find much information about Philippa James, but she definitely made colourful earthenware pots with inspiration from Australia’s flora. One of her pots was featured on the cover of the October 1983 edition of The Australiana Society Newsletter (see the links below) where a little bit of her history starts to come through.

So back to the main point of this post, I’m chuffed that I have some pots in Aus and that somebody really likes them. Even further, to have my pots beside Philippa James’ beautiful creations is more than an honour. Philippa’s work is so nice that they’re inspiring me to try some new things, so it’s back to the pottery studio for me.

Related Links

  • Some nice images of Philippa James’ work – http://www.antiquesreporter.com.au/index.cfm/category-lots/1798-james-philippa/
  • The October 1983 edition of The Australiana Society Newsletter (14 Mb pdf file) – 20_October_1983_No_4
    • This newsletter features one of Philippa James’ pots on the cover and she gets mentioned twice. Do a search to find her name and a little bit of the history starts to come through

Written by Peter · Categorized: Features · Tagged: Australia, Philippa James

Jul 07 2019

Loading the kiln with a variety of pieces

Loaded the kiln today with a whole variety of pieces. For the first time, if I’ve counted correctly, I loaded pieces made by ten different people. Ten! That’s great. We’ve been having so much fun in the pottery studio. I’ve got some photos below going through the process of loading the kiln.

This load is for a bisque firing. So many of the pieces will look quite boring at this stage. It’s after this firing, and after the subsequent glazing, that all the interesting colours come out.

Some of the pieces waiting before loading the kiln. Actually, all the pieces have to dry out as much as possible before the firing.

In this image, you can see a couple of Gloria’s funky chicken wall hangings in the early part of creation.

Many items from many different artists.

That bowl at the front left is mine. It looks boring now, but I hope it turns out really interestingly after firing and glazing.

Love those two trays of Gloria’s

loading the kiln
Lowest shelf of the kiln loaded. There’s my bowl and Gloria’s two trays.

loading the kiln
Second shelf loaded. There are those funky chickens!

loading the kiln
Third shelf loaded. A couple of these pieces have glaze already applied, but it’s glaze that fires at a low temperature so it can go in a bisque firing.

loading the kiln
Fourth shelf loaded.

loading the kiln
Using a half-shelf to try and get everything in.

loading the kiln
Using a second half-shelf, and everything is in!

So now, after loading the kiln, it’s time to close the lid and set the process off. This bisque firing goes up to a maximum temperature of 1060ºC, which is also fine for some of the pre-mixed coloured glazes that we use as well. So, some of the pieces will be simply bisque fired and require a second, glaze firing that goes to an even higher temperature. The pieces with the pre-mixed coloured glazes will be complete when they come out of this bisque firing.

It’s always exciting to see how things turn out (sometimes it’s depressing when things don’t work well) and if something surprisingly good turns up. All I can do now is wait, and let the kiln do its thing.

Written by Peter · Categorized: In the studio · Tagged: bisque, kiln

Jul 07 2019

Ceramic House Sign

Today, Gloria created a Ceramic House Sign as a birthday gift for a friend. It was a request from her friend who lives in Portugal and Gloria was happy to oblige. She started with six bisque fired white square (6×6 inches) tiles and decorated them with coloured glazes. 

See more of the story in pictures below…

Gloria painting the ceramic house sign

ceramic house sign
Working on the fundamental design now, using coloured glazes…

Ceramic House Sign

ceramic house sign
Getting close to finished now…

Applying a clear top glaze over everything. It looks blue, but it will be clear after firing…

All glazing done and just waiting to dry for a bit…

Two to the ceramic house sign tiles made in onto this shelf of the kiln…

The other four tiles had to be put on two, stacked half-shelves…

So now the kiln is running and the firing is underway. It will be about 36 to 48 hours before we can open it and see how the ceramic house sign has turned out. 

We’ll post an update with the results, which will hopefully be good (fingers crossed!).

The final tiles will have to be packed safely and hand-carried to Portugal for delivery at Gloria’s friend’s birthday party.

If you go online, it looks like everyone makes ceramic house signs. You can order them from all sorts of people (for example, Pottery House Signs) with what appears to be all sorts of quality levels, however, it’s something special for a friend to hand-make a ceramic house sign specially for an occasion. It’s also pretty cool to know that some of Gloria’s work has been requested from yet another country, Portugal, and it’s a real pleasure to be able to do something so personal for such a good friend. We’re very much looking forward to the celebrations!

Written by Peter · Categorized: In my studio · Tagged: ceramics, house

  • « Go to Previous Page
  • Page 1
  • Page 2
  • Page 3
  • Go to Next Page »
  • About Us
  • Blog
  • Privacy Policy
  • Subscribe
  • Search
  • Contact

Copyright © 2025 · FabHappy Limited